Posted on September 5, 2010 by Noemi Le
I bid on this cute plate holder on ebay a little wile back and guess what, I won! I was so stoked and couldnt wait to get it in the mail. Well once I got it hubby didnt like it as it was and told me to “make it pretty”…So thats what I did =]
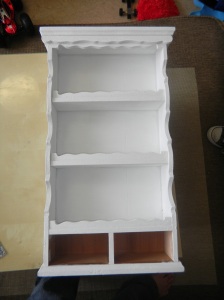
Before
After a little white paint to cover up the chipped parts and some pretty napkins this is what it looks like.
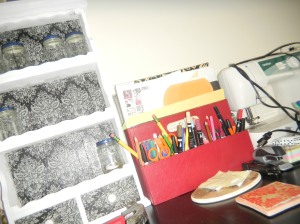
After
Please note the picture was taken by my 2 year old son =D But anyways, its not quite finished…As you can see I havent gotten around to painting the lids of the empty Gerber jars, they are getting spray painted red by the way. Its just been raining and iv been so busy but hopefully they get done this week! Oh the knobs for the drawers are getting painted red too =]
I promise to post a better picture of it once its all done!
Filed under: Decoupage, Mod Podge | 1 Comment »
Posted on July 24, 2010 by Noemi Le
LOL Yup just a small face lift =p Our bathroom walls were so plane they needed something! Once again I turned to my favorite craft material Mod Podge to help with the face lift. Using some scrapbook paper, Mod Podge, canvas and ribbon I came up with these pretties.
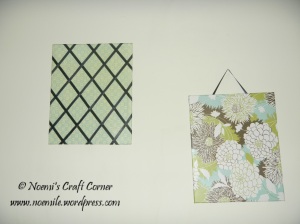
Bathroom Face Lift

Checkered Ribbon
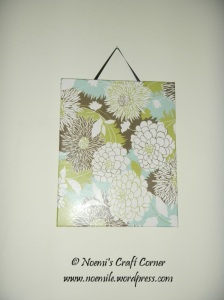
Plain 'n Simple
Filed under: Decoupage, Mod Podge | 1 Comment »
Posted on July 24, 2010 by Noemi Le
The title says it all LOL I started this a little while ago and just havent finished it =[ I need to add a few more things but hubby has to drill a couple of wholes 1st. It will eventually be in our bedroom holding my necklaces =]

Filed under: Decoupage, Mod Podge | Leave a comment »
Posted on July 24, 2010 by Noemi Le
I started what I thought would be a box for my recipes that are just sitting in one of my kitchen drawers…Once I finished it I really liked it for my sister LOL so its getting mailed to her hopefully next week =]

Top View
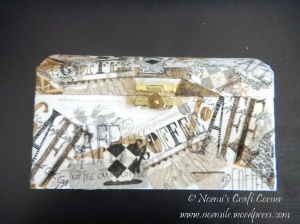
Front View
This was super easy to make! All I used was a napkin which I cut the different pictures out of, some paint (as you can see I missed a part by the clasp) and Mod Podge! =]
After I had finished it and told my sister I had made her something with a coffee print on it for her kitchen, she told me her kitchen had a wine theme…Therefor I made her something else in that theme =]

Musical Wine
I LOVED the way these turned out! By the way its a set but they look exactly the same so I didnt see a reason to show both LOL Once again materials are, Mod Podge, napkins and decoupaging paper =] All I did was add it to an 8×10 canvas. I hope you like them sis!
Filed under: Decoupage, Mod Podge | Leave a comment »
Posted on May 31, 2010 by Noemi Le
Im so proud of my latest project, mostly because it was for my hubby and he loved it! Here it is =]

My hubby’s had the drawers for a while and iv always wanted to do something with them but wasnt sure what…A few weeks ago Amy over at ModPodge Rocks posted on her FB page a project someone else did with the same drawers and Mod Podge so I just had to do the same thing with his! LOL
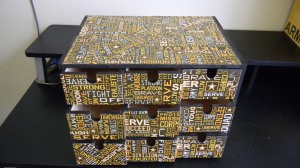
Above is the one that my hubby started but didnt get to finish because I was out of that scrapbook paper.
Filed under: Decoupage | Leave a comment »
Posted on May 18, 2010 by Noemi Le
I was cutting out t he cork backs for the coasters yesterday and I was left with pieces not big enough to use for the coasters but too big to just toss, I had to do something with them! I just didnt know exactly what so I slept on it LOL When I got up this morning I new exactly what I wanted to do with them, a note/message frame! I had one last frame that I couldnt use *Just a side not…I bought a bulk of black frames from a lady that was changing her decor last year and there were a few that were for German size photos, so those are the frames iv been using for my projects*
The frames was black so I painted over it with white acrylic paint and then used a paper napkin and used Mod Podge to adhere it to the frame. While I let that dry I used the back of the frame and adhered the pieces of cork in different directions to cover the entire thing. Then I used white chipboard letters, ribbon, flowers, and brads to add a little bit of fun to it. What do you think?
Filed under: Altered, Decoupage | 3 Comments »
Posted on May 17, 2010 by Noemi Le
Iv been waiting for y material to come in for the longest time and its finally here! It took longer thank expected because of the ashes from the volcano that erupted somewhere out here in Europe…But anyways…I went to check the mail today and they were here! All I need to do is find the right tile out here, I have one more place to check out hopefully they have it there. Maybe I’ll go this weekend.
So I asked a friend that was going to a hardware store a little ago  to pick up a tile for me and the only one kind they had was ones with prints on them 😦 so she just got me one of those sine she knew I was going to cover it up anyways lol…I’ll eventually be doing my coasters with paper napkins but because they are so thin I couldnt do it with this tile…So I just used a piece of scrapbook paper from the Gnome Girl Kit I purchased over at http://www.oddbirdplanet.com. I wasnt so sure I wanted to just cut out the square and Mod Podge it over the tile so I tore the sides instead and did it that way 🙂 The tile is a bit of a brownish earth tone and not what i’ll be using in my shop either but hey this one is just for me so it doesnt matter LOL Oh and the bottom is lined with cork to protect the furniture =]
Filed under: Decoupage, Etsy | 1 Comment »
Posted on April 21, 2010 by Noemi Le
Been feeling really creative lately so im taking advantage of my kids playing on their own to let the creativity out 🙂
Here is a little something I put together using an old frame, napkins, mod podge, coasters from the dollar section at my local PX, chip board letters, flowers and a little sparkle.
What they looked like…

After a little paint…

Finished project

Filed under: Altered, Decoupage | Leave a comment »
Posted on April 21, 2010 by Noemi Le
This was originally something else compleatly…It was actually suppose to be a clock but never got around to finishing it. (Tiff you should recognize this lol) It had been put away with my crafting supplies that the clock face I had done for it decided it didnt want to stay so I helped it out and took it off…Now I had this piece of perfectly good wood that needed a bit of a face lift lol so it was transformed to a sign for my craft area.
Here is what it looked like after taking off the clock face.

This is what it looks like now after some Mod Podge, paper napkins, stamps, flowers, and a little bling 🙂

Yes I know the “Corner” is slanted but I think it gives it character =p Oh by the way I have decided that this will be the name to my new Etsy shop opening soon! Super excited!
Filed under: Altered, CTMH, Decoupage, Etsy | Leave a comment »
Posted on April 14, 2010 by Noemi Le
I decided today that I wanted to get a few things started for once my shop opens, (hopefully May) so I put together a few Thank You tags that I will be adding to my packaging. Please dont mind the horrible picture, my hubby has my good camera lol

Materials
- CTMH White Card Stock
- CTMH Archibal Black Ink
- Paper Napkins
- Stephanie Bernard’s Mini Stamps
- Crop-A-Dial
- Stampin Up Paper Punch
- Mod Podge
Filed under: CTMH, Decoupage, Etsy | Leave a comment »


